Goal
To build a wireless device with servo-motor and ESP32, make a software to controll the servo by your motion.
Preparation
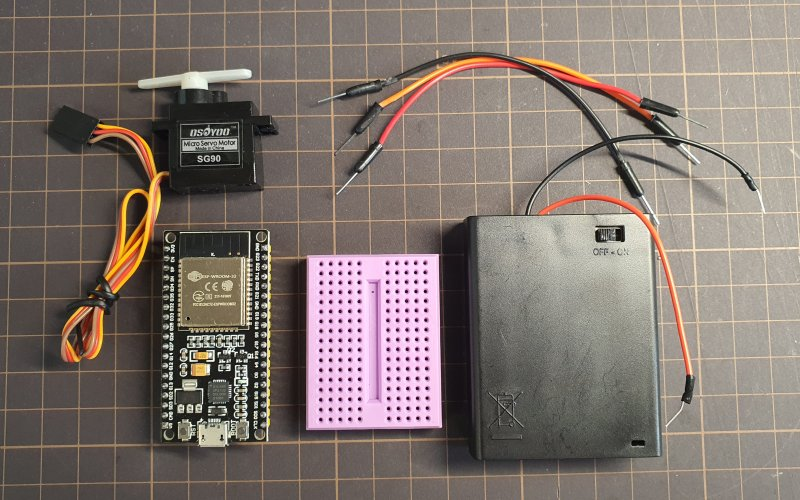
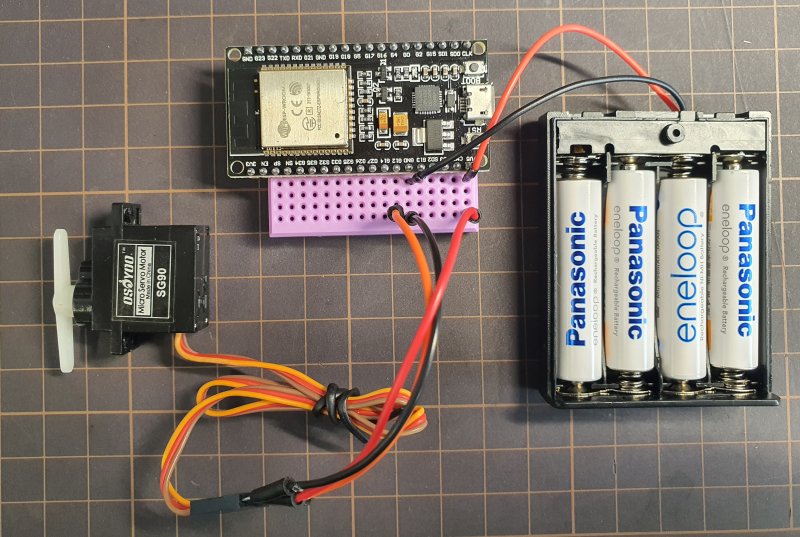
Check hardware components
- ESP32
- SG90 type servo motor
- Mini bread board
- Battery box (3 x AAA)
- Jumper wires
Install software
- python 3.10
- run the installer
- check on the “Add Python to PATH” checkbox.
- opencv for python
- Run command promt by Win+R, “cmd”
- Type “pip install opencv-python”
- mediapipe
- run the command prompt and type “pip install mediapipe”
- Arduino.exe
- you don’t have to install at WS, it prepares already.
- if you want to use it a tyour home, just download zip and extract it OR download installer. (it takes long time to extract/install, please wait when you will try.)
- Driver fo CH210
- you also don’t have to install it(and you don’t have right to install in the ICC, if it will not work properly, I will call technical staff).
- if you want to install the driver, open the device manager(Win+x,m) and find the CH210 device and install the new driver.
Check the installed python environment
- Run command promt by Win+R, “cmd”
- type “python –version” and check the version.
- type “python” to run the interactive python, and type
- >>>import cv2
- >>> import mediapipe
if there are no error, libraries have been successfully installed. congrat! - >>>exit()
Set the configuration of Arduino.exe
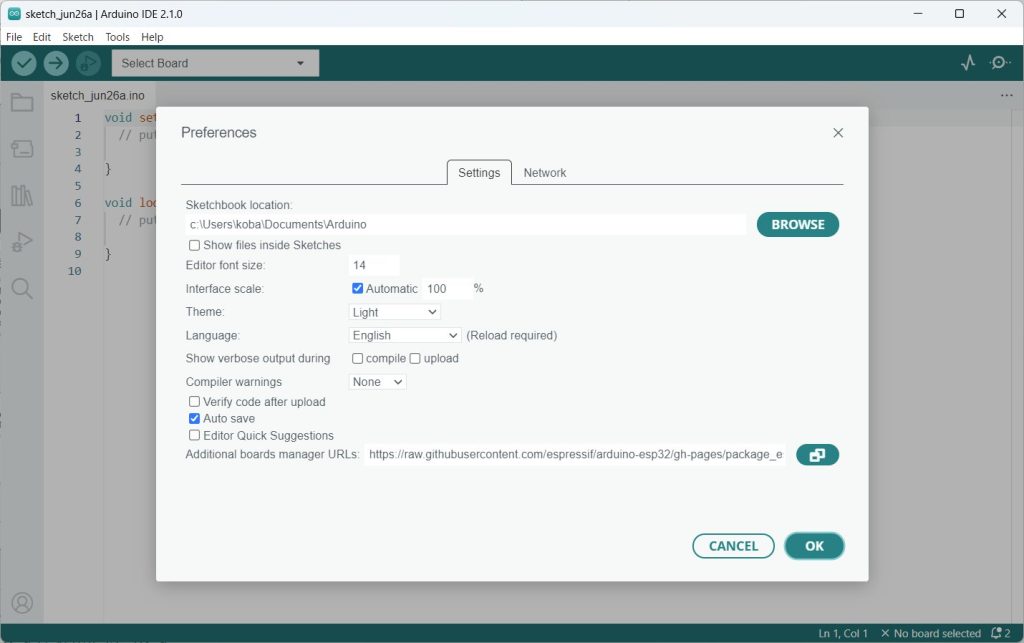
Go to File Menu -> Preferences -> [Additional board managers], input the URL:
https://raw.githubusercontent.com/espressif/arduino-esp32/gh-pages/package_esp32_index.json
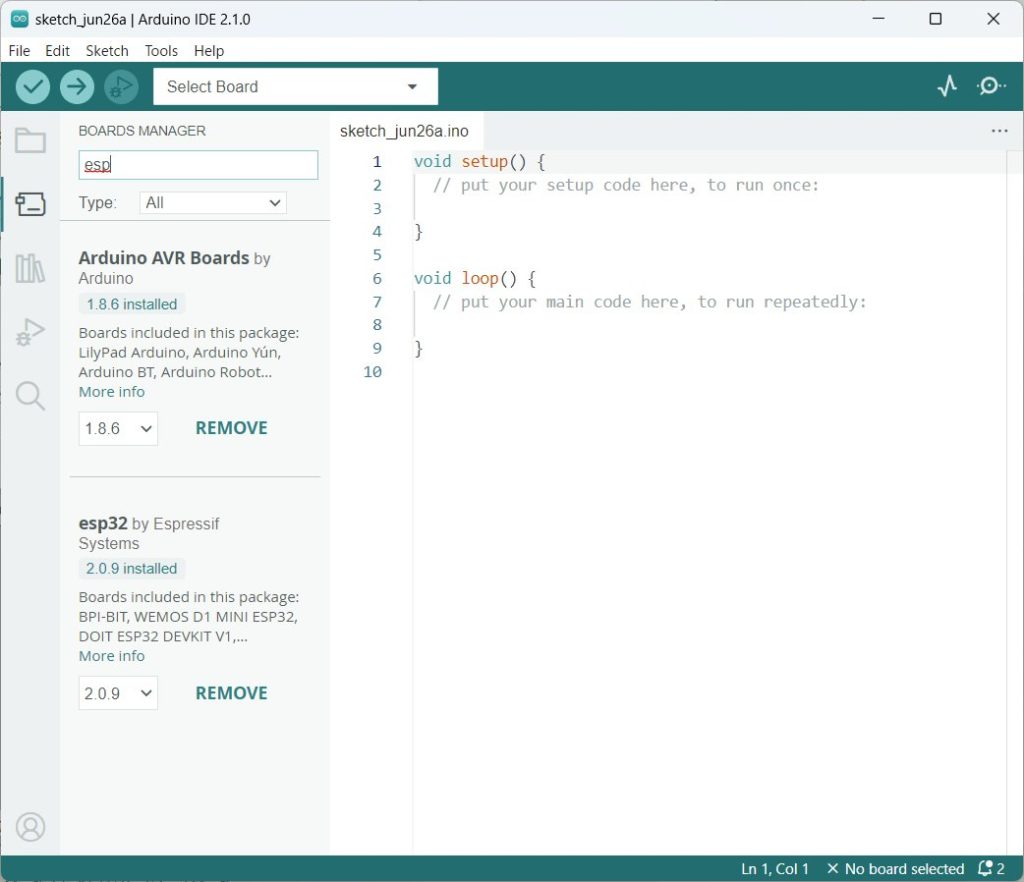
Select Tools Menu -> Board -> Board Manager (Ctrl+Shift+B) , input “esp” to find ESP32 and press the install button. (Below picture has only “remove” because it is after installed.)
Servo Library
Go to “https://github.com/RoboticsBrno/ServoESP32” and Download. Move these files to (user) -> Documents -> Arduino -> libraries folder.
Build a Hardware device
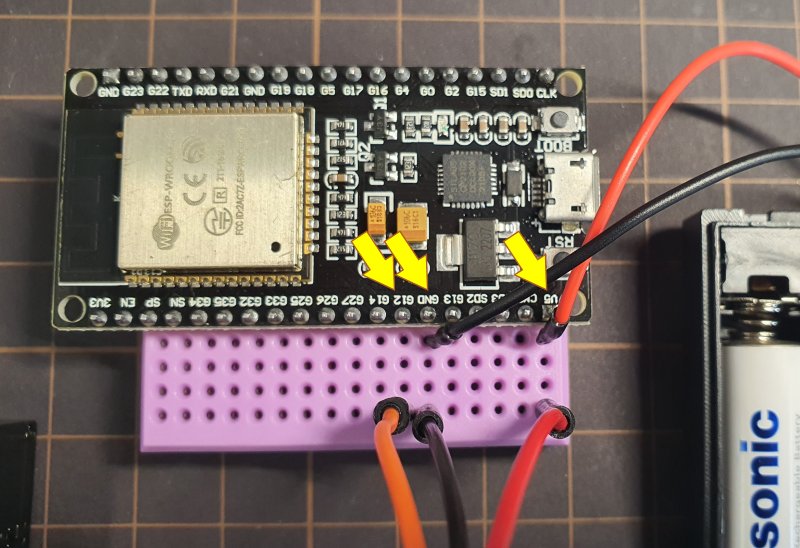
- Insert ESP32 to the bread board
- Insert battery cables to the bread board to connect them to Vcc and GND.
- Insert servo motor pins to the bread board to connect Vcc, GND, and control pin of GPIO(in this case, G12).
Sample code for checking the servo motor
To check the function of ESP32, run the code below with Arduiono.exe.
- Copy & Paste codes, save with appropreate file name.
- Check COM port number by Tools menu -> Port.
- Check CPU Model by Tools menu ->Board -> esp32 -> ESP32 Dev Module
- Ctrl+U(pload).
Write an arbitraly degree
#include <Servo.h>

Servo myservo;        //make a servo object.

void setup() {
  myservo.attach(12); //attach G12 as a servo control pin.
}

void loop() {
  myservo.write(180); //rotete to 180 degree.
  delay(1000);        //wait 1000 mili second = 1 second.
  myservo.write(0);   //rotate to 0 degree.
  delay(1000);        //wait 1000 mili second = 1 second.
}
just after uploaded the sample code, the servo motor will move 180 deg —0 deg.
Control by a message via serial port
#include <Servo.h>
Servo myservo;        //make a servo object.
String data="";       //prepare a variable for receiving strings.
char tmp;             //prepare a temporal variable.

void setup() {
  myservo.attach(12); //attach G12 as a servo control pin.
  Serial.begin(115200);//start serial communication.
}

void loop() {
  while(Serial.available()){//continue during received data is remained...
    tmp=(char)Serial.read();//capture one character data from the buffer.
    data+=tmp;              //add it to the variable 'data'
     if(tmp == '\n'){       //if the buffer is vacant,
      myservo.write(data.toInt());//change the "data" to integer and write to the servo motor.
      delay(10);            //wait until the servo motor moved
      data ="";             //clear the valiable 'data'
     }
  }
}
Upload this sample to the ESP32 and run. Then, Serial monitor should be woke up and input some numbers and press the send button.
Control via Bluetooth Serial
#include <Servo.h>
#include "BluetoothSerial.h"
BluetoothSerial SerialBT;//make a BlueTooth object
Servo myservo;
String data="";
char tmp;

void setup() {
  myservo.attach(12);
  SerialBT.begin("ICC-ESP");//name an arbitrary strings.
}

void loop() {
  while(SerialBT.available()){
    tmp=(char)SerialBT.read();
    data+=tmp;
     if(tmp == '\n'){
      myservo.write(data.toInt());
      delay(10);
      data ="";
     }
  }
}
Upload this sample to the ESP32 and run.
Try to find the Bluetooth name (in this case, “ICC-ESP.” But please name another one because all participants should name different one.), and connect it. You can find new COM as a BT-Serial.
Send some number as string via the BT-COM.
Try to make a Mediapipe code
Make a new python file(arbitrary_name.py) and open it by notepad, copy the source below, paste it.
import cv2
import math
import mediapipe as mp

mp_drawing = mp.solutions.drawing_utils
mp_drawing_styles = mp.solutions.drawing_styles
mp_pose = mp.solutions.pose
pre_angle_s = 0 #Previous Angle of Shoulder

cap = cv2.VideoCapture(0)
with mp_pose.Pose(min_detection_confidence=0.5, min_tracking_confidence=0.5) as pose:
  while cap.isOpened():
    success, image = cap.read()
    if not success:
      print("Ignoring empty camera frame.")
      continue
    image.flags.writeable = False
    image = cv2.cvtColor(image, cv2.COLOR_BGR2RGB)
    results = pose.process(image)

    image.flags.writeable = True
    image = cv2.cvtColor(image, cv2.COLOR_RGB2BGR)
    mp_drawing.draw_landmarks(image, results.pose_landmarks, mp_pose.POSE_CONNECTIONS,landmark_drawing_spec=mp_drawing_styles.get_default_pose_landmarks_style())
    if results.pose_landmarks:
      x1=results.pose_landmarks.landmark[12].x #x1,y1 = shoulder
      x2=results.pose_landmarks.landmark[14].x #x2,y2 = elbow
      y1=results.pose_landmarks.landmark[12].y
      y2=results.pose_landmarks.landmark[14].y

      if x2<x1:
        angle_s = int(math.degrees(math.atan((y2-y1)/(x1-x2))))
      else:# x2>=x1
        angle_s = int(180+math.degrees(math.atan((y2-y1)/(x1-x2))))

      if angle_s < 0:
        angle_s = 0
      elif angle_s > 180:
        angle_s = 180

      print("\r"+str(angle_s))

    cv2.imshow('ICC23-WS', cv2.flip(image, 1))
    if cv2.waitKey(5) & 0xFF == 27: #press ESC to exit
      break
cap.release()
Insert codes concerns to BlueTooth Serial.
import cv2
import math
import mediapipe as mp
import serial
mp_drawing = mp.solutions.drawing_utils
mp_drawing_styles = mp.solutions.drawing_styles
mp_pose = mp.solutions.pose
pre_angle_s = 0
ser = serial.Serial('COM5', 115200)#change the COM number to your device.
cap = cv2.VideoCapture(0)
with mp_pose.Pose(
min_detection_confidence=0.5,
min_tracking_confidence=0.5) as pose:
while cap.isOpened():
success, image = cap.read()
if not success:
print("Ignoring empty camera frame.")
continue
image.flags.writeable = False
image = cv2.cvtColor(image, cv2.COLOR_BGR2RGB)
results = pose.process(image)
image.flags.writeable = True
image = cv2.cvtColor(image, cv2.COLOR_RGB2BGR)
mp_drawing.draw_landmarks(
image,
results.pose_landmarks,
mp_pose.POSE_CONNECTIONS,
landmark_drawing_spec=mp_drawing_styles.get_default_pose_landmarks_style())
if results.pose_landmarks:
x1=results.pose_landmarks.landmark[12].x #x1,y1 = shoulder
x2=results.pose_landmarks.landmark[14].x #x2,y2 = elbow
y1=results.pose_landmarks.landmark[12].y
y2=results.pose_landmarks.landmark[14].y
if x2<x1:
angle_s = int(math.degrees(math.atan((y2-y1)/(x1-x2))))
else:# x2>=x1
angle_s = int(180+math.degrees(math.atan((y2-y1)/(x1-x2))))
if angle_s < 0:
angle_s = 0
elif angle_s > 180:
angle_s = 180
#print("\r"+str(angle_s))
#Send the angle string via Bluetooth
if abs(angle_s-pre_angle_s)>5:
ser.write(str.encode(str(angle_s)+"\n"))
pre_angle_s = angle_s
cv2.imshow('ICC23-WS', cv2.flip(image, 1))
if cv2.waitKey(5) & 0xFF == 27:
break
cap.release()
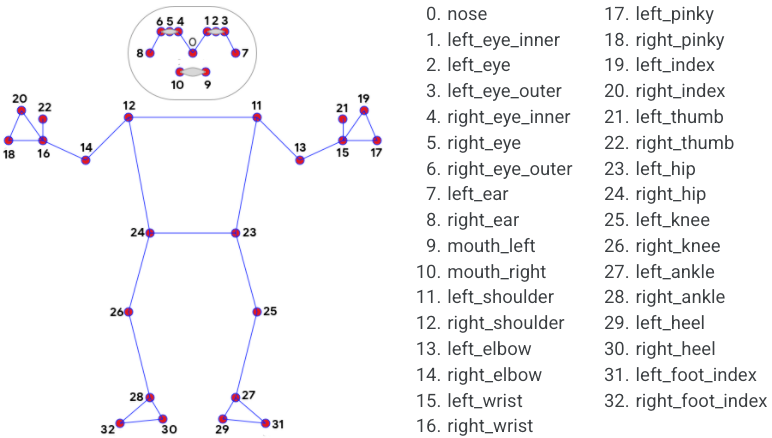
ser.close()#close Serial port.Landmarks info
Landmarks info is shown in the next figure.
to change the measured positions, just change the number of arrays. For example, if you want to measure the angle of your left elbow, change the number of the arrays as below:
x1=results.pose_landmarks.landmark[13].x x2=results.pose_landmarks.landmark[15].x y1=results.pose_landmarks.landmark[13].y y2=results.pose_landmarks.landmark[15].y